Welcome to this hands-on guide where we’ll walk through the process of creating your very own custom chatbot (conversational agent) by simply uploading a file!
In this post, you’ll learn how to obtain your CustomGPT’s RAG API key, set up and run the Python notebook on Google Colab, and understand what each section of the code does.
Whether you’re new to the CustomGPT’s RAG API or looking to expand your automation toolkit, this tutorial has you covered.
Make sure you have read our Getting Started with CustomGPT.ai for New Developers blog to get an overview of the entire platform..
Link to the complete notebook – https://github.com/Poll-The-People/customgpt-cookbook/blob/main/examples/Create_Bot_By_File.ipynb
1. Prerequisites to use CustomGPT RAG APIs
Before you dive in, make sure you have the following:
- CustomGPT.ai Account: Sign up and log in at CustomGPT.ai.
- RAG API Key: Generate your RAG API token from your account dashboard.
- Basic Python Knowledge: Familiarity with Python and REST APIs will help you follow along.
- Google Colab: We’ll use Google Colab to run the notebook—no local setup required!
2. Setting Up Your Environment in Google Colab
Now that we understand the fundamentals, let’s prepare our working environment using Google Colab. This cloud-based platform offers free access to computing resources, making it ideal for our bot development agent. Follow the steps below to set up everything you need.
Opening the Notebook
- Upload the Notebook: Open Google Colab and upload the Create_Bot_By_File.ipynb file.
- Install Required Libraries:
In the first cell of the notebook, ensure you install any necessary libraries (for example, sseclient-py for handling streaming responses):
!pip install sseclient-pyConfiguring Your RAG API Key
Locate the section in the notebook where the API endpoint and token are set:
api_endpoint = 'https://app.customgpt.ai/api/v1/'

api_token = 'ADD_YOUR_API_TOKEN_HERE'
Replace ‘ADD_YOUR_API_TOKEN_HERE‘ with your actual RAG API key. This key authenticates your requests to the CustomGPT’s RAG API, so keep it secure!
Get Your RAG API Key
To get your RAG API key, there are two ways:
Method 1 – Via Agent
- Agent > All Agents.
- Select your agent and go to deploy, click on the API key section and create an API.
Method 2 – Via Profile section.
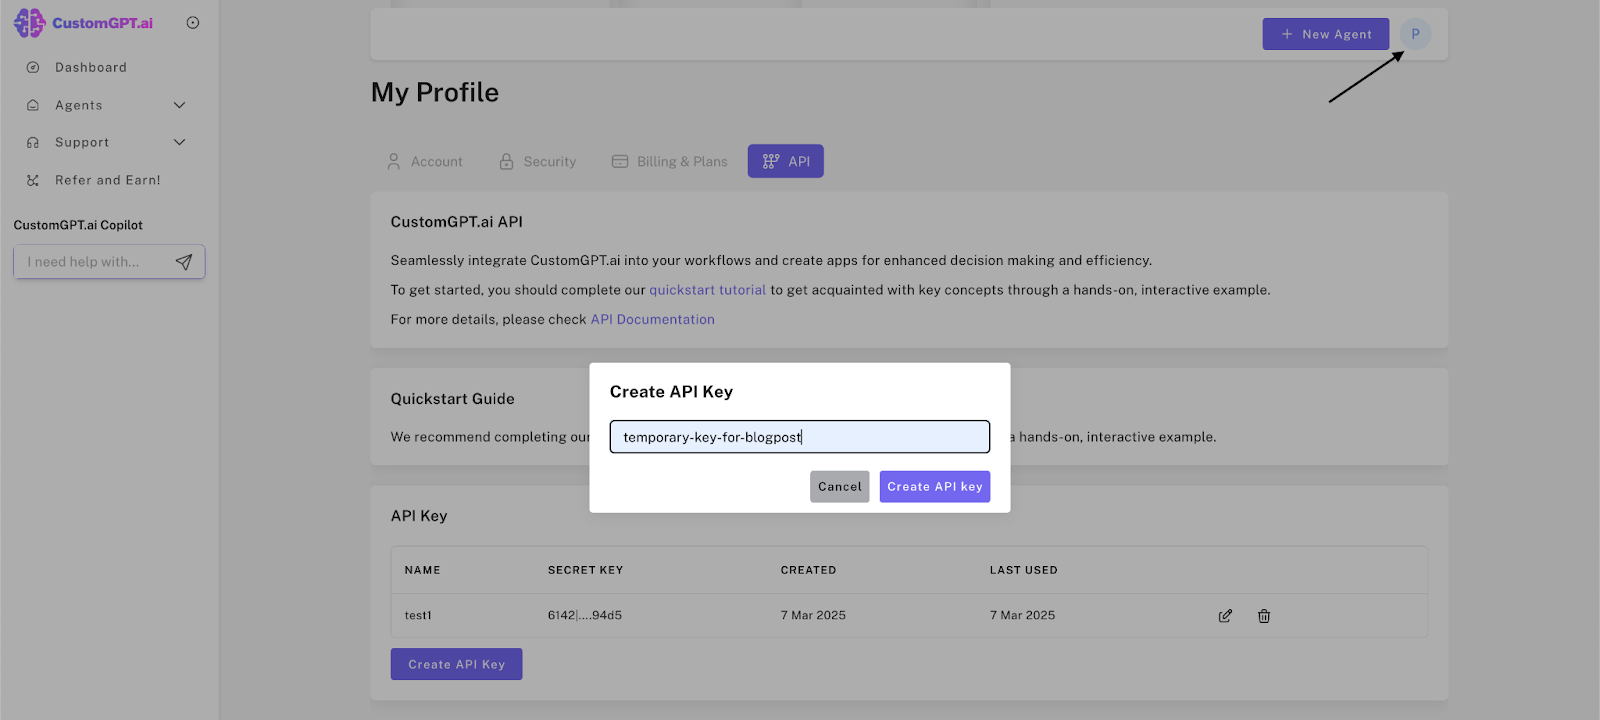
- Go to profile (top right corner of your screen)
- Click on My Profile
- You will see the screen something like this (below screenshot). Here you can click on “Create API key”, give it a name and copy the key.

Please save this secret key somewhere safe and accessible. For security reasons, You won’t be able to view it again through your CustomGPT.ai account. If you lose this secret key, you’ll need to generate a new one.
3. Code Walkthrough
This guide explains how the code sets up a custom chatbot agent, checks its status, and starts a conversation. Each section builds on the previous one, so you can follow along step by step.
3.1 RAG API Endpoint & Token Setup
- Purpose: This block sets the base URL for the RAG API and initializes the authentication token.
- Details: The RAG API endpoint is stored in a variable, ensuring that every request is sent to the right server. At the same time, an authentication token is set up to access the RAG API securely.
- Security Note: The RAG API key (token) is sensitive. Never share it publicly to avoid unauthorized use.
Now that you have set up the RAG API endpoint and token, you are ready to move on to creating your agent by uploading a file.
3.2 Agent Creation via File Upload
- Uploading the File: The code uses the google.colab.files module to allow you to upload a file from your computer. This file is used to create the chatbot agent.
from google.colab import files

uploaded_file = files.upload()

file_content = next(iter(uploaded_file.values()))

file_data = file_content- Here, you upload a file, and the code picks up the content of the first file uploaded, storing it in file_data.
- Defining the Agent: Now, you give your agent a name and prepare a payload that includes the project name and the file data.
project_name = "Create a Custom Conversational Agent by Uploading a File"

payload = {

    "project_name": (None, project_name),

    "file": file_data

}- The project name is formatted as a tuple to meet the RAG API’s requirements.
- Creating the Agent: Next, a
POSTrequest is sent to the RAG API to create the agent:
url = api_endpoint + 'projects'

create_project = requests.request('POST', url, headers=headers, files=payload)

print(create_project.text)
When the request is successful, the RAG API returns details about the new project, including its unique project ID.
Having created your agent, the next step is to check the status and details of the project to make sure everything is set up correctly.
3.3 Project Status and Details
- Extracting Project Information: This part of the code extracts the project ID from the RAG API’s response and checks if the chatbot is active:
data = json.loads(create_project.text)["data"]

project_id = data["id"]

url = api_endpoint + 'projects/' + str(project_id)

get_project = requests.request('GET', url, headers=headers)

project_data = json.loads(get_project.text)["data"]

is_chat_active = project_data["is_chat_active"]

print(is_chat_active)- The project ID is pulled out from the
JSONresponse, and aGETrequest checks theis_chat_activeflag. This flag tells you whether the project is ready for conversations.
Now that you have confirmed the project details, you are ready to start a conversation with your agent.
3.4 Conversation Creation and Messaging
- Initiating a Conversation: With the project active, the next step is to create a conversation session:
headers['Content-type'] = 'application/json'

url = api_endpoint + 'projects/' + str(project_id) + '/conversations'

payload = json.dumps({

    "name": "My First Conversation"

})

create_conversation = requests.request("POST", url, headers=headers, data=payload)

print(create_conversation.text)- This POST request sends a JSON payload with the conversation name. The RAG API responds with conversation details, including a session ID.
- Streaming Chat Responses: Now, you can send a prompt to the bot and receive its responses in real time using the Server-Sent Events (SSE) protocol:
from sseclient import SSEClient

conversation_data = json.loads(create_conversation.text)["data"]

session_id = conversation_data["session_id"]

prompt = "Who is Professor Mois ture"

stream = 1

url = api_endpoint + 'projects/' + str(project_id) + '/conversations/' + str(session_id) + '/messages'

payload = json.dumps({

    "prompt": prompt,

    "stream": stream

})

headers["Accept"] = "text/event-stream"

stream_response = requests.post(url, stream=True, headers=headers, data=payload)

client = SSEClient(stream_response)

for event in client.events():

print(event.data)- The code sends the prompt in a POST request with streaming enabled. The SSEClient reads the events from the server, printing each event as the bot’s response is streamed in.
You have now learned how to set up your RAG API connection, create a chatbot agent by uploading a file, check the project status, and start a live conversation with your agent. Each step builds on the previous one, guiding you through the complete process of interacting with the chatbot RAG API.
4. Running and Testing the Notebook
Now that you are all set with the code and the configurations, let’s start with the execution of them. Follow the below steps for an easy ride towards creating your own custom conversational agent by uploading a file.
Step-by-Step Execution in Colab
- Execute Each Cell: Run the cells sequentially in Google Colab.
- Observe Outputs:
- Project Creation Confirmation: See the JSON response confirming your project is created.
- Active Chat Status: The boolean output (True or False) tells you if the chatbot is active.
- Streaming Conversation: Watch as the bot processes and returns responses to your prompt.
Verifying Your Project on CustomGPT.ai
After running the notebook, log into your CustomGPT.ai dashboard to see your newly created project. The project should appear automatically with the details you provided in the notebook.
5. Beyond the Notebook: Building a Menu-Driven Program
While this notebook demonstrates a single function—creating a bot by file upload—the true power of the CustomGPT’s RAG API is in combining multiple functionalities into a cohesive tool. Imagine a menu-driven program where you can:
- Add Files to Projects
- Delete or Update Projects
- Manage Conversations and Retrieve Chat History
- View Project Statistics and Settings
Example Idea: Menu-Driven CLI
Here’s a pseudo-code snippet to illustrate:
def main_menu():

    print("CustomGPT CLI Menu:")

    print("1. Create Bot by File")

    print("2. Add a File to an Existing Project")

    print("3. Delete a Project")

    # ... other options

    choice = input("Enter your choice: ")

    if choice == "1":

        create_bot_by_file()  # Call the function corresponding to our notebook

    elif choice == "2":

        add_file_to_project()

    # ... other conditions

if __name__ == "__main__":

    main_menu()
This modular approach allows you to integrate multiple RAG API endpoints into one unified application, simplifying complex workflows.
6. Troubleshooting Common Issues
Even with clear instructions, you might encounter some challenges:
- Invalid RAG API Key: Ensure your RAG API key is correctly inserted and hasn’t expired.
- File Upload Errors: Verify the file format and size, and re-upload if necessary.
- Connectivity Issues: If the RAG API isn’t reachable, check your internet connection or firewall settings.
- Error in Streaming Response: Make sure you have installed the sseclient-py package correctly. Use the command !pip install sseclient-py before running the streaming code.
For additional troubleshooting, refer to the CustomGPT.ai documentation or join the community forum for support.
7. Conclusion
In this guide, we walked through how to create a custom conversational agent by uploading a file using the CustomGPT’s RAG API. You learned how to:
- Configure your RAG API key and set up your environment in Google Colab.
- Understand each step in the notebook—from project creation to real-time conversation streaming.
- Think about scaling this functionality into a menu-driven program to manage multiple operations.
With these building blocks, you’re now ready to explore other aspects of the CustomGPT’s RAG API and expand your projects. Happy coding, and feel free to share your experiences with the community!
Priyansh is Developer Relations Advocate who loves technology, writer about them, creates deeply researched content about them.
