
Are you interested in taking the next step and leverage CustomGPT.ai’s intuitive and developer-friendly RAG API? Look no further! In this article, I’ll guide you through the process of creating a chatbot using the CustomGPT.ai RAG API endpoint, step by step. In the last post, we had a look at What are RAG API Endpoints and how these API Endpoints work.
Now we will build the CustomGPT.ai chatbot programmatically using POST, GET, and DELETE Endpoints. You don’t need to be a tech wizard to follow along, we’ll keep things simple for you. Let’s get started!
Create your custom chatbot easily by just following these few steps:
Step 1: Choose your workspace
First things first, pick the environment where you feel most comfortable. In this guide, we’re going with Jupyter Notebook, an online tool for working with Python code.
Step 2: Set up your RAG API access
To create CustomGPT.ai using an RAG API endpoint, first define the endpoint(Specific URL) where we will send a request to create our custom chatbot. And a RAG API_key for user authentication. This api_key is your secret key. It’s a unique identifier that allows you to access the CustomGPT.ai service securely.
- api_endpoint = ‘https://app.customgpt.ai/api/v1/‘ is the address where your request will be sent
- api_token = ‘ADD_YOUR_API_TOKEN_HERE’, place your actual API_key here

In simpler terms, these lines are like setting up the address and key for a secure conversation with the CustomGPT.ai service. They ensure that when you make requests, the service(CustomGPT.ai) knows who you are and can understand the information you’re sending.
Check the full blog to see how you can get your API_key: A beginner Guide to CustomGPT API
Step 3: Create your chatbot using POST Endpoint
The next step is to create your chatbot using the POST APIs. This endpoint enables you to initiate the creation of a new project by supplying the necessary project data that will be used as the context.

Let’s break down the above lines of code for explanation:
- project_name = ‘Example ChatBot using Sitemap’: Give your chatbot a name.
- sitemap_path = ‘Sitemap for your chatbot’: Give your chatbot a sitemap of your website to train it. You create a sitemap for your chatbot using a free sitemap tool. Just put your website URL and this tool will create a sitemap of your website.
- payload = json.dumps({“project_name”: project_name, “sitemap_path”: sitemap_path}): Think of this as packing your project details neatly. You’re bundling the project name and sitemap path into a package that the CustomGPT.ai service can easily understand.
- url = api_endpoint + ‘projects’: Here, you’re creating the full web address (URL) where your request will be sent. It’s like putting together the address of the destination you want to reach.
- create_project = requests.post(url, headers=headers, data=payload): This is the moment you hit the “create” button. You’re sending your project details to the CustomGPT.ai service, asking it to set up a new project based on your specifications.
- print(create_project.text): print function shows the result if the chatbot is created or not.
Now run this code with Name and sitemap, Here I created my chatbot “Health Assistant” using the sitemap of my website.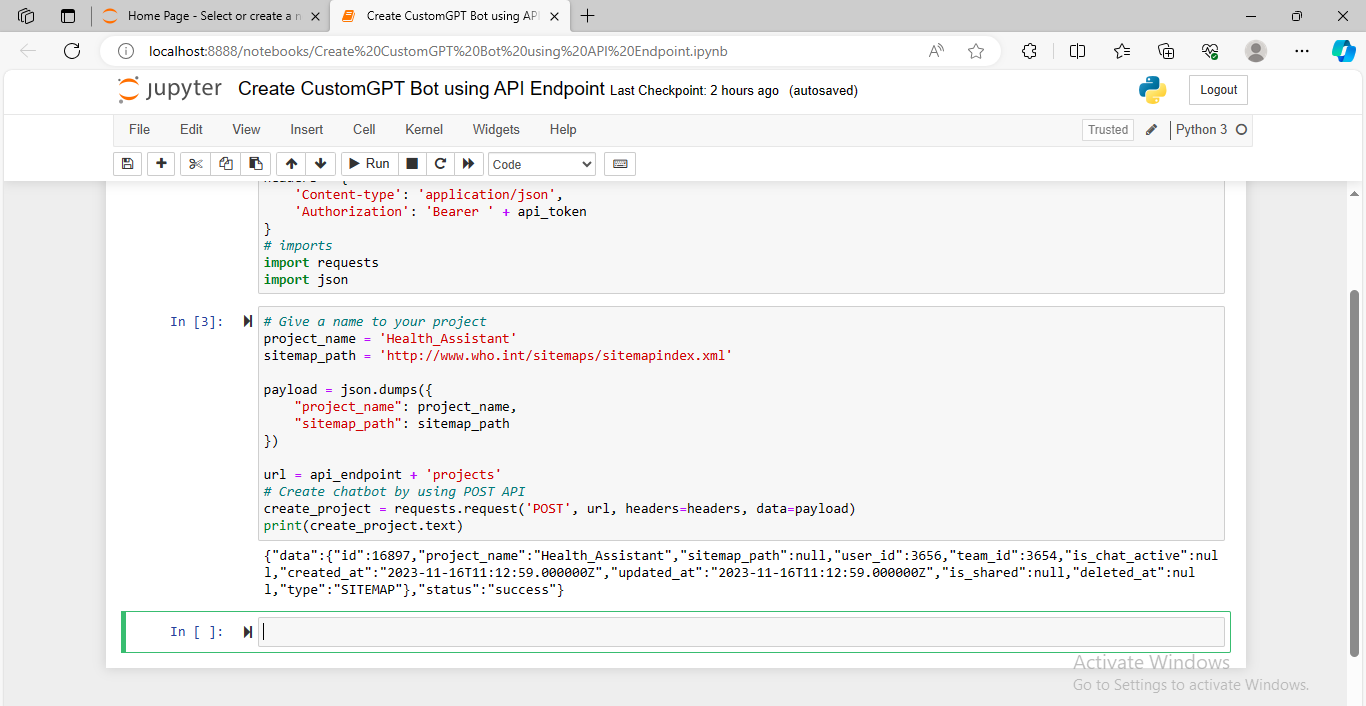
You see in response to the POST endpoint request my chatbot was created successfully. The generated response also contains information about the project_id. You can use this project_id further to get information about your project.
Step 4: Check the status of your chatbot using GET Endpoint
We will use the GET API endpoint to get specific information about my chatbot. This endpoint provides extensive statistics about the project’s performance, activity, or other relevant metrics.
We want to check the status of a chatbot, A request to check the status of the chatbot will be sent using GET API to the CustomGPT.ai project, and in response, it will tell us if the chatbot is active or not.

You can see in the above lines of code that GET API Endpoint uses project_id to send request. Run the code and check the response to our request.

If the response is generated True it shows the chatbot is activated, but if the response is false it shows the chatbot is not activated. The response we get is True which shows that the chatbot is active. Now let’s move forward to see the chatbot in action by asking questions.
Step 5: Create a new conversation using POST Endpoint
Start a new chat in your project before asking your chatbot a question. We’ll use the POST endpoint for this by sending a request to CustomGPT.ai. In the next line of code, the request is sent to CustomGPT.ai using a specific URL:
- create_conversation = requests.request(“POST”, url, headers=headers, data=payload)

See the response by running the above lines of code.

The responses show that the My First conversation is created successfully. You can also see the new conversation is created in the CustomGPT.ai interface.

Step 6: Install the package for streamlining responses
To connect to the chatbot for streaming responses, start by installing the “sseclient-py” package. Execute the following command to install it:
- pip install sseclient-py
Write these lines of code in your Jupyter notebook and run the code.

Step 7: Query your Chatbot using POST Endpoint
Now query your chatbot by sending a request to CustomGPT.ai project using POST Endpoint. In response to the generated response of your question is sent back. Write the following lines of code in your Jupyter Notebook to send a query to your chatbot.

In the above lines of code,
- Essential details of the ongoing conversation, like the session ID, from the previous conversation data are retrieved. This is like getting the context of the ongoing chat, so you know where to add your new message.
- The prompt variable holds the text of your question.
- The stream variable is set to 1, indicating that you want to receive a streaming response. It’s like saying, “Hey, I want to see the replies as soon as they come in, not all at once.”
- Then, you assemble the URL where your message will be sent. The requests.post line is sending your question to the CustomGPT.ai service, and you’re specifying that you want a streaming response.
I wrote a question related to the data I provided to my ‘Health Assistant’. And you can see it generated the right response to my question.
The loop with SSEClient is where the magic happens. It’s like keeping an eye on your chat for incoming responses. As new messages arrive, the loop prints out the data. It’s the equivalent of watching your chat screen for real-time updates, ensuring you’re part of an interactive conversation.
This was the whole process of creating a chatbot using RAG API endpoints.
You can also delete a certain project using POST Endpoint.
Delete a project Using the DELETE API Endpoint
Delete a project by its unique project ID using the DELETE API Endpoint. This endpoint allows you to remove an existing project from the system based on its ID.

Conclusion
Endpoints act as efficient gateways facilitating the smooth transfer of data between different applications and systems, ensuring that the digital conversation between applications is smooth, reliable, and tailored to the specific needs of businesses. As data flows seamlessly through endpoints, applications become more responsive and user-friendly.
This enhanced performance contributes to an improved customer experience. Integrating chatbot using CustmGPT RAG APIs holds the potential to enhance user interactions, provide valuable information, and contribute to the success of your applications. Stay tuned for more exciting insights and advanced features as you continue your exploration of CustomGPT.ai RAG APIs! Happy coding!
Frequently Asked Questions
Which coding environment can you use to follow the RAG API bot setup?
You can use the environment you’re most comfortable with. The walkthrough uses Jupyter Notebook as the example workspace for running Python code.
What do you need before making your first RAG API request?
You need two essentials: the API endpoint URL and your RAG API key. The API key is a secret credential used for authentication, so it should be handled securely.
What HTTP methods are used to build and manage a bot in this guide?
The guide states that bot creation and management are done programmatically using POST, GET, and DELETE endpoints.
Do you need MCP Server to start this specific implementation?
No. This implementation is centered on the RAG API endpoint workflow for creating a chatbot. MCP Server is listed separately as a developer resource, not as a prerequisite in the described steps.