
In this guide, we’ll explore how to bring CustomGPT.ai and DialogFlow together to improve your chatbot’s interactions with users. By combining CustomGPT.ai with Dialogflow, you can build a chatbot for your website that is capable of providing more personalized and refined responses. The customers can get relevant and tailored answers, due to the advanced anti-hallucination technology of CustomGPT.ai, ultimately enhancing the overall customer experience.
Throughout this integration process, we’ll assist you in creating your chatbot application that can provide an exceptional user experience. Let’s get started!
DialogFlow CX: A Google Cloud Platform to create conversational agents
With the Dialogflow CX cloud platform, you can create an agent that is like a virtual assistant to handle multiple conversations at the same time. It’s a smart tool that understands how we humans talk. Within the Dialogflow CX console, you can create “Webhooks” that are used to integrate third-party applications with DialogFlow through platform integrations to provide exceptional user experience.
CustomGPT.ai: Create Highly customized Chatbots for your Application
CustomGPT.ai is the effortless way to create your chatbot, no coding is required. Accessible from any device with an internet connection, it’s designed for everyone, not just tech experts. With its user-friendly no-code approach, you’ll have a fully functional chatbot in minutes. CustomGPT.ai is your secure and powerful AI tool for driving innovation and growth, making AI accessible to all. You can integrate it anywhere using CustomGPT.ai APIs easily, that is why API access is available for users in CustomGPT.ai every pricing Plan.

Integrating DialogFlow CX with CustomGPT.ai
By following a few steps you can integrate CustomGPT.ai with Dialogflow to create a chatbot application for your business.
Create Your CustomGPT.ai account
First, go to the CustomGPT website. Once you’re there, then:
- Create your CustomGPT account using your ‘Name’ and ‘Email.’
- Once your account is created, go to the dashboard and click on “Create a New Project”. Define the purpose of your chatbot by training it on your website data. After training your chatbot, test your chatbot by asking a few questions to check if it responds according to the training data.

See the full blog on How to create and train a CustomGPT chatbot on your website data.
Get your Custom Chatbot API_key
Get your project API_key from your CustomGPT.ai account. As this API_key will be further used in the integration process, save it securely.
See the full blog on CustomGPT API_key
Webhook creation
When creating a custom AI chatbot application, the user queries will be sent to CustomGPT.ai and responses generated by CustomGPT.ai will be sent back to DialoFlow for users. For this streamlined process of generating responses, a Webhook will be created. A webhook works like a bridge between two systems to send real-time data to another system or application whenever a user asks a question. This way systems can communicate with each other automatically, enabling seamless integration and data exchange.
Write the following code script to create a webhook for your custom chatbot integration process in a Webflow chatbot.
Install all Dependencies
Set up the development environment and install the necessary Python libraries. In this guide to creating a custom chatbot application, we are using the Flask framework to create a web server. Import necessary modules for handling HTTP requests, configurations, and interaction with the CustomGPT.ai chatbot through CustomGPT.ai API endpoints.

(“/webhook”) is the path that will define how a request will be sent to the CustomGPT.ai chatbot when the user asks a specific question. After sending a request to CustomGPT.ai the responses will be generated and sent back to the Dialogflow for the users.
Flask Setup and CustomGPT.ai Configuration for Webhook Endpoint
Next, we will build a Flask web application, I named it “app” and configured it with key settings for a CustomGPT.ai chatbot. The next step involves providing the CustomGPT.ai chatbot project ID, API key, and base URL, which will be retrieved from the Configuration module.

Additionally, we’ll set up a path (“/webhook”) to handle incoming POST requests. This path is the endpoint where external applications, like Dialogflow, can interact with the Flask app we created. It enables the app to manage specific events and reply to them when triggered.
Webhook Processing for CustomGPT.ai Integration
Now will place the API key, user’s message, and project ID from the received request. Through this API_key you will be authorized as a valid CustomGPT.ai user to send and receive requests using Dialogflow. It will establish a new conversation before sending the user queries and labeled as ‘DialogFlow,’.

Afterward, we’ll send the user’s message to CustomGPT.ai for handling, and the chatbot’s reply will be adjusted to match the requirements of Dialogflow.

The ultimate response format, enclosed in a fulfillment wrapper, will be provided as JSON. This includes the CustomGPT.ai response. This sets up a practical webhook endpoint for connecting CustomGPT.ai with Dialogflow.
Create a Dialogflow CX Account
Create a DialogFlow account and open the Dialogflow CX console then click on Create New Project. Give a name to your project.

DialogFlow CX Chatbot Application set up
To set up a DialogFlow CX project and configure a webhook, follow these steps:
- After creating a new DialogFlow CX project, navigate to the left side panel of the project interface.
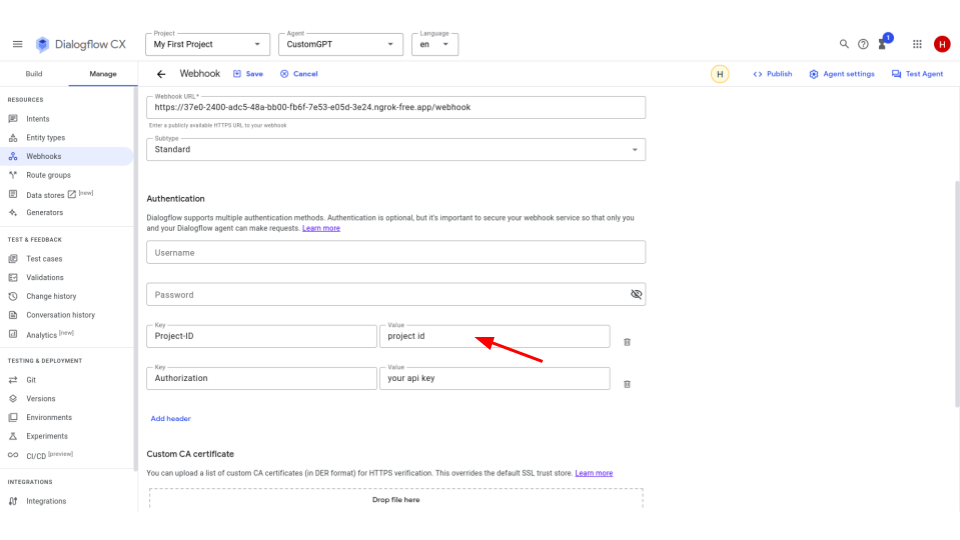
- In the left panel, click on “Manage,” then select “Webhooks.” And create a webhook for your chatbot project.

- Provide the URL of your hosted endpoint in the “Webhook URL” box. This is the address where DialogFlow will send users queries and will receive CustomGPT.ai responses. You can use ngrok for creating webhook URLs.

- To ensure that DialogFlow waits a reasonable amount of time for a response by setting the Webhook Timeout to 30. Here your CustomGPT.ai project ID and API key will be used for secure communication and data exchange between custom cchatbot and DialogFlow.

- Save the configured webhook settings to apply the changes. This establishes the connection between your Dialogflow CX project and the external service, allowing for seamless communication and integration.

Following these steps ensures that your DialogFlow CX project is set up with the necessary webhook to interact with your hosted endpoint securely and efficiently.
DialogFlow CX Intent Configuration
- Within DialogFlow CX, click on the “Build” section in the side panel. In this section, you can manage and define the components of your conversational agents.

- Click on the “Start Page” option, and then choose the “Welcome Intent.” This is the starting point for interactions, usually employed to welcome and guide users.

- In the fulfillment section of the Welcome Intent, if there are any existing agent responses then clear it out. This will ensure a consistent triggering of the CustomGPT.ai call without interference from default responses.

- Select the created webhook from the dropdown by enabling the webhook. Save the configuration.

Test your Application
Test your application after completing the setup to ensure that your Dialogflow CX project is correctly configured and the webhook is functioning as intended.
Before publishing your application test the chatbot thoroughly to confirm that it functioning as expected. Deploy the project into your business workflow to make the custom chatbot available for your customers.
Conclusion
In conclusion, integrating CustomGPT.ai into Dialogflow offers an opportunity for businesses to enhance their customer experience. By incorporating CustomGPT.ai’s advanced features with Dialogflow, you can create a chatbot that delivers more refined and personalized responses to users. Users can receive responses that not only align with the context but are also tailored to their specific user’s queries. Creating such advanced solutions enables your businesses to enhance customer interactions and gain a competitive edge by providing an elevated user experience.
Frequently Asked Questions
How do CustomGPT.ai and Dialogflow CX work together?
Ontop’s AI agent “Barry” handles over 100 questions weekly, reduced response time from 20 minutes to 20 seconds, and saves 130 hours per month for its legal team. In a typical Dialogflow CX integration, Dialogflow CX manages the conversation flow while a webhook sends knowledge-heavy user questions to a trained bot through the API and returns the answer. That setup lets you keep structured bot logic in CX while grounding responses in your own source material.
How do I reduce hallucinations in a Dialogflow CX bot?
TaxWorld’s AI tax assistant reached a 97.5% success rate across 189,351 queries. A reliable way to reduce hallucinations is to train the bot on your own website, documents, and other approved sources, then have Dialogflow CX call that retrieval-based knowledge layer by webhook for factual answers. Anti-hallucination retrieval with citation support helps keep replies tied to source material instead of unsupported guesses, and a published benchmark shows stronger RAG accuracy than OpenAI.
How hard is it to connect Dialogflow CX to an external knowledge bot?
Joe Aldeguer, IT Director at Society of American Florists, described the integration fit this way: “CustomGPT.ai knowledge source API is specific enough that nothing off-the-shelf comes close. So I built it myself. Kudos to the CustomGPT.ai team for building a platform with the API depth to make this integration possible.” In practice, the setup is straightforward: train the bot on your content, create a webhook in Dialogflow CX, authenticate with an API key, and send the user’s message to the OpenAI-compatible /v1/chat/completions endpoint. Start with one route, confirm the response format, then expand.
How should I store the API key for a Dialogflow CX webhook?
Use API key-based authentication and keep the key stored securely, since it is required for the webhook integration. A safe pattern is to keep the key in the webhook or backend that Dialogflow CX calls, rather than exposing it in a client-side app. Relevant security and privacy credentials include SOC 2 Type 2 certification, GDPR compliance, and a policy that data is not used for model training.
Can I personalize Dialogflow CX answers with my own business knowledge?
Stephanie Warlick, Business Consultant, summarized the value this way: “Check out CustomGPT.ai where you can dump all your knowledge to automate proposals, customer inquiries and the knowledge base that exists in your head so your team can execute without you.” You can personalize answers by training the bot on your website, documents, audio, video, or other supported sources, then connecting it to Dialogflow CX through a webhook. Custom personas and branding can further tailor how responses sound for your business.
Related Resources
If you’re exploring integrations, these guides add useful context and next steps.
- CustomGPT.ai With Streamlit — Learn how to build a custom application that connects CustomGPT.ai with Streamlit for a tailored chat experience.
- Custom Chatbot Development — Follow a practical walkthrough for planning, building, and refining a chatbot around your specific business needs.
- How CustomGPT.ai Works — Get a clear overview of how CustomGPT.ai is built, how it answers questions, and what powers its workflow.