[This is Part 2 of a Multi-Part Series on the CustomGPT.ai RAG API]

In our last post, we unveiled the basics of using the CustomGPT.ai RAG API, guiding you through creating your own chatbot within the broader CustomGPT.ai platform overview. If you missed it, take a moment to check out A Beginner’s Guide to the CustomGPT.ai RAG API (Part 1). We’ll now explore initiating conversations, fine-tuning interactions, and leveraging streaming responses to bring your AI to life. Prepare to unlock the advanced features of your CustomGPT.ai chatbot, designed to elevate your business’s operational efficiency.
Query your CustomGPT.ai Chatbot
In the last post, we wrapped up by creating a new conversation. Continuing from there, we’ll pick things up by focusing in on querying your chatbot.
Querying your Chatbot without Streaming
Now you might be thinking what is streaming? Sending a message without streaming means the message in the responses is generated all at once not in chunks. As you can see below when I will query my chatbot it will generate all the messages at once.
Code to query your chatbot
Let’s look at things line by line. We’ll present a line of code, then a description.
<code>session_id = project_data.data.session_id</code>Retrieves the session ID from the data obtained after creating a conversation. The session ID is a unique identifier for the ongoing conversation.
prompt = "I am new to entrepreneurship. Write some good books to read"
Specifies the message or question that you want to send to the chatbot.
sresponse = CustomGPT.Conversation.send(project_id=project_id, session_id=session_id, prompt=prompt, stream=False)
Sends the specified prompt to the ongoing conversation in the CustomGPT.ai RAG API. The stream=False parameter indicates that the response should not be streamed, meaning you’ll receive the entire response at once.
print(response)
Print function prints the response received from the RAG API after sending the prompt.

Putting it all together, let’s see how the response is generated with streaming false:

You can see the question is asked and the answer generated in the CustomGPT.ai interface when you create a CustomGPT.ai bot.

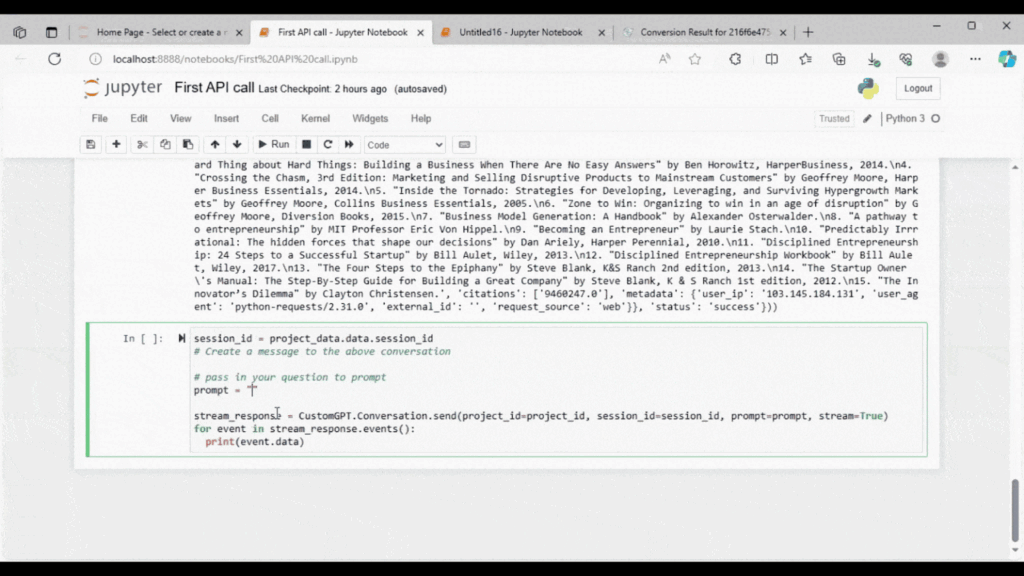
Querying your Chatbot with Streaming
Now I will query the chatbot with Streaming. We’ll use the same code as above, but now we’ll modify the Streaming parameter to True.
response = CustomGPT.Conversation.send(project_id=project_id, session_id=session_id, prompt=prompt, stream=True) when creating conversations and sending messages
Sending messages with RAG API streaming true means that the response will be generated in chunks not all at once As you can see below
This was the whole process of creating and querying your chatbot programmatically using CustomGPT.ai RAG API.
Request and Response Structure
The request and response structure refers to how information is formatted and communicated between the client (making the request) and the server (responding).
When you request the RAG API endpoints (like creating a project or sending a message to a chatbot), you structure your request with the necessary information in the headers, method, endpoint, and body (if applicable). The server then processes the request and responds with a status code and any relevant data in the response body.
Request Structure:
Headers: Information about the request, such as content type or authorization.
HTTP Method: Specifies the type of action the client wants to perform (e.g., GET, POST, PUT, DELETE).
Endpoint: The URL or URI that identifies the specific resource or action.
Body (optional): Data sent to the server, often used in POST or PUT requests for creating or updating resources.

Response Structure:
Status Code: A three-digit code indicating the outcome of the request (e.g., 200 for success, 404 for not found).
Headers: Additional information about the response, like content type or server details.
Body: Data sent by the server in response to the request. This can include the requested information or an error message.

I simply requested the server to show details of a certain project using the RAG API key and Project_id. And in response, all the detail is shown about the project ‘My Assistant’.
Troubleshoot and Support
Even the most skilled developers can encounter hiccups when working with APIs. When an issue arises, it’s not just about finding a solution; it’s about persistence and understanding the nature of the problem. A key tool in your troubleshooting arsenal is the knowledge of HTTP status codes. These codes are not mere numbers; they are vital indicators that offer insights into what might be going wrong.
Whether it’s a misstep in the request format leading to a ‘400 Bad Request’ or an authentication hiccup flagged by a ‘401 Unauthorized’ error, these codes help pinpoint the issue, turning obstacles into stepping stones towards a resolution. Familiarizing yourself with these codes will prepare you to navigate through challenges and ensure your use of the CustomGPT.ai RAG API is as smooth and efficient as possible.
Response Codes
We utilize HTTP status codes to indicate success or failure, as stated below:
| Status Code | Description |
| 200 – ✅ Success | A successful request. |
| 400 – ❌ Bad Request | The request has failed due to a client error. |
| 401 – ❌ Unauthorized | The RAG API Key credentials are invalid or missing. |
| 403 – ❌ Forbidden | You are not authorized to carry out the requested action. |
| 404 – ❌ Not Found | The requested resource can’t be found. |
| 500 – ❌ Internal Server Error | The web server is encountering issues. |
Troubleshoot Options
Below are our recommendations on how to handle errors:
400 – Bad Request
| Cause | This error arises from invalid syntax or a missing required parameter. |
| Suggestion | Double-check the request you have entered to ensure it complies with the requirements. |
401 – Unauthorized
| Cause | This error will occur when attempting to make an RAG API call with incorrect RAG API credentials |
| Suggestion | Verify your access token, or renew the RAG API key if needed. |
403 – Forbidden
| Cause | This error will occur when access to the requested page is prohibited. |
| Suggestion | Verify the URL and ensure you have entered the web page’s correct file name and extension. |
404 – Not Found
| Cause | This error arises either because of an incorrect URL provided or because the requested ID is not linked to any transactions. |
| Suggestion | Ensure you use the accurate URL, and review the RAG API documentation meticulously to check for any typos. |
500 – Internal Server Error
| Cause | This error will occur when CustomGPT.ai experiences an internal system error. |
| Suggestion | You may attempt the operation again later. If this error persists, please contact our support page. |
Conclusion
We’ve taken a glimpse into the vast potential and user-friendly nature of the CustomGPT.ai RAG API. The ease it brings to the table is remarkable, making it a valuable tool for anyone looking to enhance their projects. You can seamlessly integrate the CustomGPT.ai RAG API into your projects easily. The possibilities are wide-ranging, promising a journey of innovation and improved user experiences tailored to your unique requirements. Let the power of CustomGPT.ai RAG API empower your projects and elevate your user experience.
Frequently Asked Questions
What is the difference between streaming and non-streaming in the API chatbot?
u0022They’ve officially cracked the sub-second barrier, a breakthrough that fundamentally changes the user experience from merely ‘interactive’ to ‘instantaneous’.u0022 — Bill French, Technology Strategist. In practice, streaming returns the answer in chunks as it is generated, while non-streaming returns one complete response at once. Use streaming for live chat experiences where fast perceived response matters. Use non-streaming when your app needs a single finished payload for logging, parsing, or post-processing.
Does streaming make the API chatbot less accurate?
No. Streaming changes how the response is delivered, not the request itself. The documented examples send the same prompt with either stream=True or stream=False; the difference is whether the reply arrives in chunks or as one complete response. If you want easier debugging, use non-streaming so you can inspect the final response body in a single payload.
How do I keep conversation context across multiple API calls?
Reuse the same session_id for follow-up messages in the same conversation. The session_id is the unique identifier for the ongoing conversation, so keeping it consistent preserves the thread across calls. Start a new session_id when you want a separate conversation history.
Can I call the API from PHP?
Yes. PHP is one of the listed SDK languages, and you can also call the OpenAI-compatible REST API directly over HTTPS. A typical request uses API key authentication and includes fields shown in the tutorial such as project_id, session_id, prompt, and the optional stream flag. If your app already uses an OpenAI-style client, the /v1/chat/completions endpoint is designed as a drop-in replacement.
Can I deploy the API behind WhatsApp or Slack?
u0022Based on our huge database, which we have built up over the past three years, and in close cooperation with CustomGPT, we have launched this amazing regulatory service, which both law firms and a wide range of industry professionals in our space will benefit greatly from.u0022 — Michael Juul Rugaard, Founding Partner u0026 CEO, The Tokenizer. Yes, but usually through an integration layer. The documented deployment options include API access and 1400+ integrations via Zapier, so teams typically connect the chat channel to the API rather than exposing the endpoint directly to end users.
Why does the same API chatbot sometimes give different answers?
First, check whether you are testing in the same conversation or a new one, because session_id identifies the ongoing thread. For a cleaner comparison, resend the same prompt in a fresh session and set stream=False so you receive one complete response. If the result is still not what you expect, confirm that the needed information is present in the connected knowledge sources and request structure.
Can businesses build a fully custom chat interface on top of the API?
u0022I just discovered CustomGPT, and I am absolutely blown away by its capabilities and affordability! This powerful platform allows you to create custom GPT-4 chatbots using your own content, transforming customer service, engagement, and operational efficiency.u0022 — Evan Weber, Digital Marketing Expert. Yes. You can build your own web, mobile, or internal interface and use the API for retrieval and answer generation. The documented feature set also supports custom personas, branding, analytics, and deployment patterns such as embed widgets, live chat, search bars, and direct API integration.
Related Resources
If you’re building with the CustomGPT.ai API, this guide adds useful context for enterprise-grade retrieval.
- Enterprise RAG API — Learn how CustomGPT.ai supports retrieval-augmented generation workflows for scalable, production-ready enterprise applications.