
You connect MCP to your chatbot by pointing an MCP-aware client (like ChatGPT, Claude, or a custom agent SDK) at a compatible MCP server. With CustomGPT.ai, your agent already exposes a Hosted MCP Server, you just grab its URL and token, then plug those into your chosen client.
TL;DR
Connect MCP to your chatbot by enabling the Hosted MCP Server in your CustomGPT.ai dashboard to retrieve your secure URL and token. Simply paste these credentials into any MCP-aware client, like ChatGPT or Claude Desktop, to instantly authorize your assistant to access your agent’s specific tools and knowledge base without complex integration code.
Scope:
Last updated: January 2026. Applies globally; align chatbot and MCP data access with local privacy laws such as GDPR in the EU and CCPA/CPRA in California.
Table of Contents
What MCP is and how it connects to chatbots
Model Context Protocol (MCP) is an open standard that lets AI applications, such as chatbots, connect to external tools, data sources, and workflows over a common “port.” Think of it as a universal way for models to talk to APIs, databases, file systems, and more, without custom integrations per tool.
MCP uses a client–server model. Your chatbot (or AI assistant host, like ChatGPT) runs an MCP client. That client connects to one or more MCP servers. Each server exposes tools, resources, and prompts that the chatbot can discover and call dynamically during a conversation.
When your chatbot is MCP-enabled, it can:
- List tools exposed by the server (for example, “search_kb”, “create_ticket”).
- Request additional context from resources like knowledge-base documents.
- Execute actions by invoking tools, with arguments encoded in JSON-RPC.
So “connecting MCP to your chatbot” essentially means: configuring your chatbot’s MCP client to talk to the MCP server that has the tools and data you care about.
Common ways to connect MCP to a chatbot
There are two main patterns for connecting MCP to your chatbot:
1. Using built-in MCP support in AI assistants
Some platforms, like ChatGPT, include built-in UI for adding remote MCP servers via “connectors.” You paste the MCP server URL and, where required, an auth token. The platform then discovers tools from that server and surfaces them as actions the model can call.
Typical flow:
- Open the AI assistant’s settings.
- Find the MCP / connectors / tools section.
- Add a new MCP server and paste the URL.
- Provide any token or credentials required.
- Enable the tools for the assistant or specific workspace.
From that point, your chatbot can call those tools within conversations, respecting whatever permissions the MCP server exposes.
2. Using a custom MCP client or agent SDK
If you’re building your own chatbot, you can use an MCP-aware SDK, like the OpenAI Agents SDK, to connect programmatically to a remote MCP server.
At a high level:
- Instantiate an MCP client in your code.
- Configure it with the MCP server’s URL and authentication.
- Use the SDK to list tools and resources from that server.
- Wire tool calls into your chatbot’s reasoning loop (for example, using OpenAI’s Responses API with hosted MCP tools).
- Surface results back to the end user as messages or actions.
This pattern is ideal when you want a custom UX or multi-agent orchestration while still reusing existing MCP servers.
What you need before connecting
Before you configure the connection, ensure you have the necessary components ready on both the client and server sides. Since CustomGPT.ai handles the server infrastructure, your requirements are minimal:
- A CustomGPT.ai Project (The Server): You need an active project populated with data (documents, sitemaps, or FAQs). This acts as the “brain” your chatbot will query.
- An MCP-Aware Client (The Interface): This is the application you interact with. Common options include:
- Claude Desktop App: Ensure you have the latest version installed on your local machine.
- ChatGPT: You typically need a Plus, Team, or Enterprise plan to access advanced data connectors.
- Agentic IDEs: Tools like Cursor or Windsurf if you are integrating into a coding workflow.
- Configuration Access:
- For Claude/Local Clients: You must be comfortable locating and editing JSON configuration files (specifically claude_desktop_config.json) on your computer.
For ChatGPT: Ensure you have access to “Developer Mode” or the “Connectors” settings in your account.
How to do it with CustomGPT.ai
This section walks you through connecting MCP to your chatbot using CustomGPT.ai’s Hosted MCP Server. Your CustomGPT agent already exposes an MCP endpoint you can plug into ChatGPT, Claude Desktop, or any MCP-compatible client.
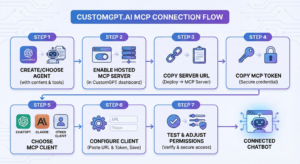
7-step setup overview
- Create or choose a CustomGPT.ai agent for MCP that has the content and tools you want your chatbot to use.
- Enable or locate the Hosted MCP Server for that project in the CustomGPT dashboard.
- Copy the MCP server URL from the “Deploy → MCP Server” section.
- Copy the MCP token from the same page, this secures your server.
- Choose an MCP client (ChatGPT connectors, Claude Desktop, or another MCP-capable tool).
- Configure the client with the URL and token, then save.
- Test and adjust MCP permissions so your chatbot only gets the access you intend.
Hosted MCP Server
Connect your chatbot to CustomGPT.ai with MCP
Build an agent from your content, copy the Hosted MCP Server URL and token, then connect ChatGPT, Claude, or another MCP-aware client.
Build an MCP-ready agentPrepare your CustomGPT.ai agent and Hosted MCP server
Start by creating or selecting the CustomGPT.ai agent whose knowledge and tools you want your chatbot to use. That agent can be connected to docs, sites, or other content as usual.
In the project, go to the Deploy section and open MCP Server. CustomGPT.ai provides a Hosted MCP Server for each project so external AI systems can connect via a secure, permission-controlled interface.
Confirm that:
- The MCP server is enabled for your project.
- The project has the documents and tools you expect (for example, your knowledge base or custom actions).
Get your CustomGPT MCP server URL and token
On the same Deploy → MCP Server page, you’ll see the Server URL and a way to obtain your MCP token.
- The server URL typically looks like:
https://mcp.customgpt.ai/projects/<project-id>/sse?token=<token> - The token is fetched from the CustomGPT app under Project → Deploy → MCP Server.
Treat the token like a password:
- Don’t hard-code it in public repos.
- Use environment variables or secrets managers in production.
These two values (URL + token) are exactly what your MCP client will need.
Connect your chatbot or MCP client (ChatGPT, Claude, or other tools) to CustomGPT.ai
Now plug those values into your chosen MCP-aware client. The specifics vary slightly, but the pattern is the same.
With ChatGPT connectors
- Open Settings → Connectors in ChatGPT.
- Click Create and choose the option to add an MCP server.
- Paste the CustomGPT MCP Server URL into the “MCP Server URL” field.
- Provide the MCP token when prompted.
- Save the connector and enable it for the assistant you’re using.
By default, the CustomGPT MCP connector in ChatGPT is scoped mainly to reading your agent’s documents and sending messages, as documented in the CustomGPT guide.
With other MCP clients (for example, Claude Desktop or tools like Trae)
- In the client’s MCP configuration, add a new MCP server.
- Paste the CustomGPT server URL.
- Configure authentication with your CustomGPT MCP token.
- Save the configuration and restart or reload the client if required.
The client will then list the CustomGPT tools and resources it can access.
Test and secure the MCP connection
Once connected, you should:
- Open your chatbot or MCP client and start a test conversation.
- Ask a question that clearly targets your CustomGPT knowledge (for example, “Answer from my CustomGPT knowledge base: …”).
- Confirm that the response is grounded in your project’s documents, not general web knowledge.
- In the CustomGPT dashboard, open MCP server permissions and review what external AI systems are allowed to do (read documents, run tools, etc.).
- Disable any permissions you don’t need to enforce least-privilege access.
If something doesn’t work, double-check the server URL, token, and any firewall or network requirements. Re-saving the configuration often forces the client to re-discover tools.
Using MCP doesn’t mean broadcasting your data to the world. The connection is local to your machine. The CustomGPT MCP server respects the same strict access controls and RAG privacy standards as our standard API. The AI model only sees the specific snippets it retrieves to answer your question, nothing else.
Example: customer-support chatbot using MCP
Imagine you already have a CustomGPT.ai agent trained on your support docs, FAQs, and internal runbooks. You want a separate chatbot in ChatGPT to answer customer questions using that content, without copying all the data again.
You deploy your CustomGPT agent as an MCP server and copy its MCP URL and token. In ChatGPT, you add a new connector using that URL and token. Now, when a user asks, “How do I reset my password? Answer from our support knowledge base,” ChatGPT calls the CustomGPT MCP server behind the scenes.
The server fetches the right article, the model generates an answer grounded in that document, and the user sees a clear, accurate response, powered by your CustomGPT agent but delivered through your ChatGPT-based chatbot.
The same pattern works with Claude Desktop or any MCP-compatible tool: one MCP server, many chatbots reusing the same knowledge and tools.
Conclusion
Connecting powerful tools to your assistant shouldn’t force you to choose between brittle custom code and generic, one-size-fits-all chatbots. CustomGPT.ai bridges that gap with hosted MCP servers, secure permissions, and instantly reusable agents that plug into ChatGPT, Claude, or any MCP client without the integration headaches. If you’re ready to turn scattered systems into one intelligent, controllable assistant layer, get started with CustomGPT.ai and connect MCP to your chatbot today.
Frequently Asked Questions
Do the external systems I want to connect need to be MCP compliant?
Usually no. What needs to be MCP-aware is the client your chatbot uses, such as ChatGPT, Claude, or a custom agent SDK, plus the MCP server it connects to. The underlying system can still be a regular API, database, or knowledge source if the MCP server exposes it as tools or resources.
Do I need a custom SDK, or can I use ChatGPT or Claude directly?
You can often start with ChatGPT or Claude directly if you want the fastest way to test a Hosted MCP Server. Use a custom SDK when the chatbot needs to live inside your own app, follow custom authentication rules, or control tool use in code.
What do MCP Server Permissions allow me to do if I connect in Claude?
In an MCP-aware client such as Claude, permissions determine which server-exposed tools and resources the assistant can use. A safe default is least privilege: enable only the specific tools required for the task.
How do I secure an MCP connection to a third-party chatbot?
Keep the Hosted MCP Server URL and token private, expose only the tools the bot actually needs, and align data access with local privacy rules such as GDPR in the EU and CCPA/CPRA in California.
Can I connect an Azure-hosted chatbot or other custom bot to the Hosted MCP server?
Yes. Azure is just the hosting environment. Your bot still needs an MCP-aware client or agent SDK to talk to the Hosted MCP Server, then map discovered tools into the bot’s conversation flow.
Can one Hosted MCP server power multiple chatbots?
Yes. A single MCP server can be used by multiple MCP-aware chatbots if they all need the same tools and knowledge access. If different bots need different access, connect them to different agents.
Related resources:
- Connect Claude to your chatbot Learn how to connect Claude to your chatbot, when it makes sense, and how to keep responses grounded in your business content
- No-code chatbot setup guide See how to start building a chatbot without coding, from defining your bot’s purpose to testing responses.
- Build a custom knowledge base chatbot Walk through manual and no-code ways to create a chatbot trained on your company’s own information.
- CustomGPT.ai WhatsApp integration guide Follow the practical steps for routing WhatsApp conversations into a chatbot trained on your own content.
- Connect Trae agents to private knowledge Follow the setup for giving Trae source-grounded answers from a CustomGPT.ai project.

Arooj Ejaz is the Marketing Operations Lead at CustomGPT.ai, where she works on content, growth operations, and go-to-market programs for AI agent and chatbot solutions.